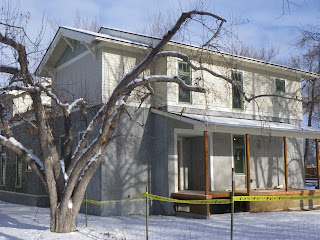
Three Generations build a house together... Eco Friendy Urban Homesteading, being as frugal as they can...

Monday, January 28, 2013

Now, For the Inside!


We've been doing most of the work on the outside and as the weather cooled, we've been able to move inside.

Sheet rock has been up and while Nathan was working on other ends of the house sheet rocking, Terese was busy mudding the sheet rock.   Between Terese and Kip we have almost everything mudded, textured.  A few rooms are even primed and painted!!

Kristen is so excited, she would do cartwheels if she could!  There is ONE ROOM that is completely finished!  TRIM and EVERYTHING!  Our laundry room became the room that made sense to finish.  As paint brushes and mud tools need to be cleaned, they were being hauled in a backpack 5 blocks or so to be cleaned.  Nathan put down the linoleum - a beautiful blue we are both in love with!  Keith put in the hot water heater for Nathan & Kristen's side.  Between Keith and Nathan, the utility sink was also installed.  This makes is so much easier to keep tools clean!  No more hauling gooey things around!  The brown on the floor is a utility paper so we don't scratch or scuff the floor while work is still being done.

laundry room

close up of laundry room floor

We have EVEN MORE floors that are done!  The front entry way has been tiled.  Nathan wanted one kind of tile and Kristen wanted another.  They once again did a good job of appreciating what the other wanted and the result is a really cool floor!  The floor is black slate and then the more natural slate in smaller tiles.  The tile entryway has been grouted and sealed.  Again, brown paper is there to protect the floor from construction traffic.

Entry way tile

The tile work was then carried into the downstairs shower surround.  We both loved the classic proportions of the subway tile.  We wanted to do something a little fun as an accent tile.  We found a great tile that we could cut so we could get three sections out of one tile (saving a bit o cash).  The tile reads a little funny in photos, but it is grey glass, white marble pieces and a darker grey slate material.  With epoxy grout in place, Kristen won't have to scrub and go crazy with cleaning the grout like she did in other houses with tile!

downstairs bath - starting

Master of the tile!


And.....drum roll....the first tile job completed by Nathan.....

downstairs bath
downstairs bath!

The room has since been painted.  When the master shower is tiled, Nathan can come back to the downstairs bath and put in flooring!  Keith mentioned this one evening and was excited about putting in the vanity and toilet!  Kristen & Jocie clapped!!  The room is really beautiful!  We're all looking forward to seeing it come together!

Nathan in master bathroom...he'll spend a lot of time in this shower before he ever gets to use it!

master bath shower progress

In other happenings, Nathan is using one of the rooms as a window ledge station.  As a way of practicing for the concrete counter tops we'd like in the kitchen, we are making a dark grey concrete window ledge for the deep windows we have (due to the double thick walls).  They look fantastic!

window ledge moulds

This last Sunday was flurry of activity with Keith working on a plumbing project, Nathan tiling, Terese painting and Kip inspecting and texturing the walls...Kristen and J got into the action!  With the help of her little friends, J picked out a wall color with her mom's help.  We painted one accent wall and it was completed fairly quickly!  Good news for the young person and for the pregnant person!  That's right!  Kristen has a little project of her own she's working on!  The tyvek suits are never flattering, but be kind, there's actually two people in that suit! 

K& J painting!

The completed wall!

All done!  We imagine this wall color will get changed quite a bit as our girl ages!


Thursday, December 27, 2012

Siding Complete: Part 2


The finished thing looks nice, but we wanted to remember all the steps involved in getting us there- and especially the friends and family that have lent a hand!

Kevin and Keith ripping up plywood strip for the siding rainscreen...
...that get secured to the foam to hold on the siding...


Kip & Gary helping to secure the rain screen strips to the side of the house- screws through the foam and into the wall sheathing....
Terese was back inside, pre-painting trim boards: Most of the trim boards and all the siding, Nathan had pre-painted at the factory before they got on-site, but there were a few extra that we needed, so like the rafter tails, we painted them inside, before installing them...

Nathan had a couple of tricky spots to trim- along the curve of the rafter tails- where the trim intersects it.

On days when it's been too cold to work outside (or too hot) we've been inside, putting up sheet rock and mudding joints...  Kip and Gary tackle the beveled openings around the patio door while Keith gets some mud on the adjacent wall...
What a Crew!  

Since we started putting up sheet rock, Terese has been following behind, taping and mudding each room. As the head "Mudder", Nathan's mother IS the main contributor to getting the rock all ready for painting!

Of course, Nathan's favorite helper is our little J. She comes over to help her daddy whenever he has something good for a 4 year old to do! Above, J was helping put in attic insulation... Below, she is helping her daddy put up some siding (on the roof deck- where no scaffolding was required- and her mamma wasn't too freaked out!):

That does it for now.  We are glad for all the good wishes and help from our friends and neighbors throughout this whole process.  We are turning our attention towards interior finishes for now until the weather warms up again in the spring.... Happy New Year!

Siding Complete: Part 1

We started siding the house back in September.  We had some really hot days still, that made it preferable to work inside on the sheet rock, so it was never a "full-steam ahead" kind of job. Additionally, the time setting up scaffolding to get access to each section of the house took a fair bit of time.  Breaking it up kept the job interesting though...

With a couple of cold days, it became clear that although the siding could be done in the winter, the stucco really had to take priority.  We wrapped up the last of the stucco back at Thanksgiving and have been finishing up all the trim and siding since then.  Below are the pictures of the place just after Christmas:

 The Front of the house- from the Southeast...  Still have the construction fence up all around the property- until next spring when Nathan gets the new fence and landscaping in...


The Front of the house- from the Southwest- you can just catch the roof deck railing between our roof line and Terese & Keith's roof line in the back...


Here is the back of the house- from the alley at the North of our lot. Eventually, Nathan will get a bike shed/chicken coop built on the alley that will make this yard a private garden for Terese...


This shed roof covers the patio doors and the entrance to Keith & Terese's part of the house.  It makes a great space for hanging out to watch the rain come down...


Here is the view of the house from the East-  we have built just a couple of the 30 or so raised beds that we are planning for this side lot...


This is a view of Terese & Keith's place- from the patio...


And here is a close-up of the trim / siding / stucco materials that Nathan brought together so beautifully for us.

We'll get part 2 assembled soon, with a lot more photos of the process- with all our friends and family who helped us out!

Monday, December 24, 2012

Roof Deck Railings

Had a chilly Christmas Eve Day- single digit temperatures all day, but Nathan finished up the railings that he started this week!  It really finishes up the roof deck nicely:


Nathan found a "red wood" that he milled up as a cap to the parapet wall, and then used galvanized pipe for the railing posts-  it will tie in with the garden fence we put in next spring.

Jocie was a great helper on this project:  She and her daddy worked together- cutting steel, filing down the burrs, and setting them in place:


Nathan drilled all the holes in the cap piece, and came up with a cool bolt connection that keeps the whole railing really sturdy:  He cut through the rubber membrane on the parapet wall:

Cut through the parapet wall sheathing- to get access to the bolt that would hold the railing cap down:

After J helped him get all the railing posts in place, Nathan inserted the long threaded rods:


Getting the holes in the cap piece all lined up took a little doing, but wasn't too bad... The threaded rods, in some key locations, keep the top cap from lifting up- and are strong enough to keep the railing assembly from being wiggly:

The 2x4 top was covered up with another, wider board to make a nice ledge for plates and glasses and such, and also covers up the bolt tops. Nathan got some "stucco panel" from Hardi to cover up the rubber roof membrane below the rail- the primed color is pretty close to our intended stucco color for the rest of the house:

We can't wait till spring to start having friends over to share meals with on the roof deck! We wrapped up the rest of the siding this week too, so now Nathan can join Terese inside where it's nice and warm to finish up sheet-rock mud, priming and painting!  More to come!