Three Generations build a house together... Eco Friendy Urban Homesteading, being as frugal as they can...

Tuesday, April 23, 2013

I wanna see!

There's so much to see!  The upstairs is almost done.  Only a small section of flooring needs to be completed!  The kitchen is nearing completion.  A few plumbing issues to work out.  (Thanks to Nathan and Keith for putting up with the sink that Kristen just loved...sorry it's such a pain!) 

I think all progress can be best seen in pictures!

Master bath vanity.  We didn't start the design out with double sinks, but the space was large enough and Kristen found a vanity that could be matched with a built in created by Nathan....

The Duluth Trading Company firehouse pants....they are apparently required clothing :)  The knees are cool - there are pockets for foam inserts.  No sweaty awkward & slipping knee pads for this crew!


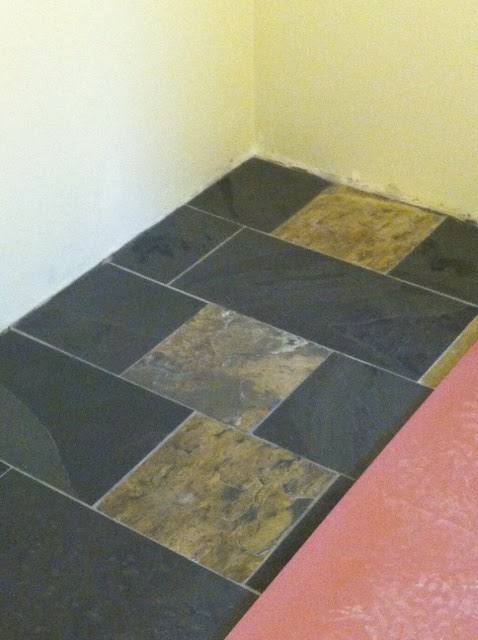
We decided to do an accent wall on the fireplace...this color is more red in person.  It really warms up the space and it's a fun jolt of color! (kitchen floor color to the right)

 The fireplace really makes the living and dining room cozy.  
 

If your gonna do color, you may as well DO COLOR!  Kitchen flooring.

THE sink!  Kristen loves it!  Thank you Nathan & Keith!

Thinking....

Deciding where things should go.  We rearranged a few cabinets once we were in the space. 

This is the window seat across from the kitchen, in progress photo.  Nathan built these based on the storage baskets we found.

Front entry way built in.  Again, the built in was created around the baskets.  Kristen is excited about each family member having their own baskets for hats, mittens, scarfs, etc!  In progress photo.

Slightly random photo...Kristen took on the project of finding old school house shades for the house.  This took quite a bit of time and a spreadsheet lodged her bag to keep track of lights needed.  Only two were purchased new...the rest were found at the Habitat for Humanity ReStore.  One light even came from Fortine, MT, almost to the Canadian border...long story! :)


Getting ready to put the trim on the stairs.

Trim board is all set to be installed.
Slips right in between the wall and the stair tread...

Clamp the board to the wall...

Insert screws!  It's a neat way to do it & the installer doesn't have to cut each stair tread into the stringer.  He's so smart.
 

A few days later, the banister went up and the stair flooring was installed.

It feels so wonderful to be walking on flooring rather than plywood.  It looks a lot sharper too!

This closet door was a happy accident and one of my most favorite little pieces in the house.  This door was found in the garage of our rental property.  The floors have bowed over the years and the previous owners just cut the doors down as the floors changed.  The door length was pretty small.  Nathan cut it down further to square it off and then added a drawer underneath to fill out the proportions.  The result is a very sweet linen closet.  Oh, and a cute kiddo who now sticks her head in every shot she can! :)

Love this door!


(This photo is sideways).  Nathan's ability to create quick drawings that give him dimension information he needs to build and the clarity of another person "seeing" what he's thinking has been a very valuable tool in these past few months.  Some of these have been sent as a text to Kristen, she critiques, sent back, approved.  ONCE we even agree on the first drawing!  Hey, with all the decisions we have to make, it's bound to happen once!


Nathan and J worked on drawings for her bunk bed even!  She loves looking at the drawings too!

She also just likes putting on her hard hat and having a go at building her own stuff!

Kitchen being installed

Wow!  That was quick work!  Cabinets installed, concrete countertops poured.  Thanks to Kip for putting handles and drawer pulls on.  (Nice sink, huh!)

Counter top edge detail.  It looks really nice.

This is a built in upstairs in the master bath.  The lines of the vanity were the model for the built in.  This will be Baby #2 changing station.  More storage will be added to the top when the tot no longer needs diapers.  Handy to have it in the bathroom!

Door detail.  This will store diaper supplies and the laundry bag.

This is what happens when you dress yourself and your parents drag you to Lowe's one too many times...

Child becomes a bathtub rock star!

It was hilarious.  I'm surprised she didn't get tips!

 
This is what Nathan and J designed!  A loft bed!  A closet just her size underneath (behind the ladder on the left/underneath).  A privacy cubby up top and a deck and slide (not yet in the room).  A little stage area underneath.  She loves it.  We all love it.  We've had a few evenings spent playing board games in the room.  Nathan and J have also played Candy Land in the bed area.  Poppa didn't want to climb up, or else they would have all three been up there playing Candy Land!
 

In another couple of weeks the younger Blanding's should be in the house.  The next step will be to get the older Blanding's side done.  Terese has started mudding and some wall texture has gone up on their side.

Thursday, March 21, 2013

Painting!

The interior work has been coming along all winter... Terese has been doing the bulk of the sheet rock taping and mudding, but Nathan and Kip have been doing their share too. Much of the house is painted, now with just a few rooms to do that are being used as work rooms for now...
\\\\\\\\\\\\
Nathan built a "trim rack" years ago, but we've really loaded it up on this project- almost 2000 Linear Feet of baseboard trim all stacked up to be primed and painted before installation...


Terese has been the main painter, but we've had help form a bunch of friends on this job... Lyon had a couple days off of school a while ago and came by to lend a hand...

 Jocie had a custom color in mind for her room... She and her mama had a good afternoon painting together!


One of Jocie's little friends didn't want to be left out, so we had a kids paint party one morning... They tackled the little room under the stairs where they were just the right height!

Nathan has been getting doors, trim work, cabinets, and built-ins installed.  Coming up next

Monday, January 28, 2013

Now, For the Inside!


We've been doing most of the work on the outside and as the weather cooled, we've been able to move inside.

Sheet rock has been up and while Nathan was working on other ends of the house sheet rocking, Terese was busy mudding the sheet rock.   Between Terese and Kip we have almost everything mudded, textured.  A few rooms are even primed and painted!!

Kristen is so excited, she would do cartwheels if she could!  There is ONE ROOM that is completely finished!  TRIM and EVERYTHING!  Our laundry room became the room that made sense to finish.  As paint brushes and mud tools need to be cleaned, they were being hauled in a backpack 5 blocks or so to be cleaned.  Nathan put down the linoleum - a beautiful blue we are both in love with!  Keith put in the hot water heater for Nathan & Kristen's side.  Between Keith and Nathan, the utility sink was also installed.  This makes is so much easier to keep tools clean!  No more hauling gooey things around!  The brown on the floor is a utility paper so we don't scratch or scuff the floor while work is still being done.

laundry room

close up of laundry room floor

We have EVEN MORE floors that are done!  The front entry way has been tiled.  Nathan wanted one kind of tile and Kristen wanted another.  They once again did a good job of appreciating what the other wanted and the result is a really cool floor!  The floor is black slate and then the more natural slate in smaller tiles.  The tile entryway has been grouted and sealed.  Again, brown paper is there to protect the floor from construction traffic.

Entry way tile

The tile work was then carried into the downstairs shower surround.  We both loved the classic proportions of the subway tile.  We wanted to do something a little fun as an accent tile.  We found a great tile that we could cut so we could get three sections out of one tile (saving a bit o cash).  The tile reads a little funny in photos, but it is grey glass, white marble pieces and a darker grey slate material.  With epoxy grout in place, Kristen won't have to scrub and go crazy with cleaning the grout like she did in other houses with tile!

downstairs bath - starting

Master of the tile!


And.....drum roll....the first tile job completed by Nathan.....

downstairs bath
downstairs bath!

The room has since been painted.  When the master shower is tiled, Nathan can come back to the downstairs bath and put in flooring!  Keith mentioned this one evening and was excited about putting in the vanity and toilet!  Kristen & Jocie clapped!!  The room is really beautiful!  We're all looking forward to seeing it come together!

Nathan in master bathroom...he'll spend a lot of time in this shower before he ever gets to use it!

master bath shower progress

In other happenings, Nathan is using one of the rooms as a window ledge station.  As a way of practicing for the concrete counter tops we'd like in the kitchen, we are making a dark grey concrete window ledge for the deep windows we have (due to the double thick walls).  They look fantastic!

window ledge moulds

This last Sunday was flurry of activity with Keith working on a plumbing project, Nathan tiling, Terese painting and Kip inspecting and texturing the walls...Kristen and J got into the action!  With the help of her little friends, J picked out a wall color with her mom's help.  We painted one accent wall and it was completed fairly quickly!  Good news for the young person and for the pregnant person!  That's right!  Kristen has a little project of her own she's working on!  The tyvek suits are never flattering, but be kind, there's actually two people in that suit! 

K& J painting!

The completed wall!

All done!  We imagine this wall color will get changed quite a bit as our girl ages!


Thursday, December 27, 2012

Siding Complete: Part 2


The finished thing looks nice, but we wanted to remember all the steps involved in getting us there- and especially the friends and family that have lent a hand!

Kevin and Keith ripping up plywood strip for the siding rainscreen...
...that get secured to the foam to hold on the siding...


Kip & Gary helping to secure the rain screen strips to the side of the house- screws through the foam and into the wall sheathing....
Terese was back inside, pre-painting trim boards: Most of the trim boards and all the siding, Nathan had pre-painted at the factory before they got on-site, but there were a few extra that we needed, so like the rafter tails, we painted them inside, before installing them...

Nathan had a couple of tricky spots to trim- along the curve of the rafter tails- where the trim intersects it.

On days when it's been too cold to work outside (or too hot) we've been inside, putting up sheet rock and mudding joints...  Kip and Gary tackle the beveled openings around the patio door while Keith gets some mud on the adjacent wall...
What a Crew!  

Since we started putting up sheet rock, Terese has been following behind, taping and mudding each room. As the head "Mudder", Nathan's mother IS the main contributor to getting the rock all ready for painting!

Of course, Nathan's favorite helper is our little J. She comes over to help her daddy whenever he has something good for a 4 year old to do! Above, J was helping put in attic insulation... Below, she is helping her daddy put up some siding (on the roof deck- where no scaffolding was required- and her mamma wasn't too freaked out!):

That does it for now.  We are glad for all the good wishes and help from our friends and neighbors throughout this whole process.  We are turning our attention towards interior finishes for now until the weather warms up again in the spring.... Happy New Year!